Makeup Review: Wet ‘n’ Wild Liquid Catsuit

I’ve heard a lot about the Wet ‘n’ Wild Liquid Catsuit liquid lipsticks over the past couple of months, and when they popped up on sale at Target I decided to bite the bullet and try them out. Truth be told, I’m not a huge fan of liquid lipsticks, but they’re incredibly practical for work. When I’m in characters, I sweat like crazy, plus I’m constantly chugging water. When I’m in gangster, I have interference from my Britney Spears mic, and in bandit I wear a bandana over my mouth that gets tugged down. So you can see why I have to have lip colors that won’t smear on me.


I picked up two shades, Give Me Mocha (a warm brown with a hint of rose) and Missy and Fierce (a bright true red). The more neutral color is for bandit, and the vampy red for gangster- I like matching my makeup to my costume.


The tubes are a good size- not too big, not too small- and hold a good amount of product. The applicator feels like a doefoot, but with a little more give to it. Definitely easy to apply (for a liquid lipstick) and easy to control.


The first color I tried was Give Me Mocha. It needed a few swipes before my lips were fully filled in- the color was patchy with just one layer- but with a second it was perfect. The texture was a little tacky for the first few minutes, but dried down pretty quickly and was surprisingly comfortable. I did notice a little flaking throughout the day, but I was able to wear the lip color from the time work started at 9:30 all the way until I got home around seven. Ordinarily I probably would have touched up my color after work, but since this was a test run, I left it alone and still wasn’t completely embarrassed to leave it on my face! I was really impressed that there was absolutely no color transfer onto my bandana, even though it was dragged over my mouth at least twenty times during the day.


I tried Missy and Fierce for my next gangster shift. (I’ve also decided that Missy and Fierce will be the name of my next bluegrass duo band). This time the color went on in a single layer with no patchiness- and most notably, no bleeding around my mouth. However, it did wear off more than Give Me Mocha did. After lunch, the inner corners of my mouth were completely colorless. At least no one could see that unless I opened my mouth really wide!

All in all I would give the Wet ‘n’ Wild Liquid Catsuit lipsticks a 5/5! The formula is incredibly comfortable, the wear is good enough (I personally don’t mind reapplying after a meal), and the colors are beautiful. Plus, at $5 and easy to find in most stores, it’s a steal!

(also, if anyone has a suggestion for an eyeliner that won’t smudge, I will give you my first born child in exchange.)

Princess Eilonwy from The Black Cauldron

So few people remember Eilonwy. It’s sad, but true. The Black Cauldron came out in 1985 and it wasn’t well-received then, and it hasn’t become a cult classic. As a sixth grader I read all of the books and loved them, and was honestly kind of disappointed in the movie. But I still loved Eilonwy, so she popped to mind when I was planning for my first Not So Scary party of the year in 2015!

 photo IMG_7161_zpsavb9urcs.jpg

I started with Simplicity’s saloon girl pattern, 2851 (now out of print) for the bodice. I’d used it once when making my short Snow White dress and thought it would be a good match. I used a sturdy black broadcloth and used red single fold bias tape for the detailing. The sleeves were from a cream cotton and I honestly can’t even tell you what pattern I used. What I can say…is that something went horribly wrong. I still can’t even describe it. One sleeve went on perfectly. The other sleeve turned out to be a demon from hell. No matter what I did, the sleeve was twisted and it made that side of the bodice twisted. I let the sleeve out, I took the sleeve in, I cut down the armscye, I cut down the shoulder…it would. not. work. It was literally an hour before I was supposed to leave, and the damn thing was unwearable. So what did I do? I ran across the street to Walmart, bought a boy’s black tee shirt and new bias tape, cut the shirt into the proper shape, stitched on bias tape, attached the sleeves from the old bodice, and bam! Wearable Eilonwy. It wasn’t fantastic, but it worked!

 photo IMG_7209_zpsghxw9z7m.jpg

The skirt, luckily, was much easier. I cut and sewed pale pink cotton into a dirndl skirt layer (with pockets) and then used a rose colored fabric cut into a circle panel over the top, leaving about a two inch gap between the edges of the panel where it was sewn over the pale pink layer. I used the rose fabric to make a casing for an elastic waistband. It works fine, but the fabric is heavy enough to make the skirt slide when it’s worn. I’m either going to remake the waistband to make it fasten with hooks and eyes, or, when I remake the bodice, add snaps so that the skirt can snap into the bodice. Honestly, I’ll probably do both just to make sure they stay in place!

 photo IMG_7110_zpsw20c0moe.jpg

I didn’t want to wear a wig for this cosplay- I’ve only worn a wig once for Not So Scary and it was the WORST (thanks for being a swamp, Florida). I bought a set of super cheap extensions on eBay instead. Are they quite the right color? No, but they’re close enough, and I’m rather fond of my cheap eBay weave. I curled the rest of my hair and brushed my hair and the extensions together to blend them a little, and pinned a length of black trim from Joann’s around my head to look like Eilonwy’s black circlet.

 photo IMG_7166_zpsfpcvrzzz.jpg

My favorite part was the bauble! I bought a clear plastic Christmas ornament from Amazon Prime (and bought another one when the first one was too small, and then forgot to cancel my subscription so after the free trial I still had Prime, oops) and painted it with sparkly yellow acrylic craft paint. On the inside I wrapped a length of battery-operated Christmas lights with yellow tulle and put the whole thing inside the ornament. It was a little bit of a hassle to pop the ornament open and closed every time I wanted to use the lights, but it was worth it!

 photo IMG_7199_zps25hfm9qd.jpg

I brought back Eilonwy for Akaicon 2016 and ended up entering her in the cosplay competition. I didn’t win, but honestly I just wanted more experience with judging and walking in the contest before I entered it seriously. I had a lot of fun, and I’m planning my entry for Akaicon 2017 now!

 photo IMG_1562_zpsjrvfgvka.jpg

 photo IMG_1462_zpsf326a81y.jpg

 photo 14205925_10205371669369988_5089254478645880638_o_zps8m34ufqd.jpg

My Akaicon 2017 Lineup

I do this to myself every year. Every year I swear I’m going to get a jumpstart on my cosplays for Akaicon, and every year I wait until a month before the con and think “oh…I should probably get started.” Procrastination is my way of life, I suppose.

At least I made my selections early on, so even though I’m leaving for the con on August 2nd (yikes!) I’m not trying to pick out cosplays at the last second. It’s a nice balance of cosplays that need minor work and bigger projects, so I’m feeling mostly confident that I can get everything done. Let’s get into it, shall we?

Eleven from Stranger Things

I put my Eleven cosplay together for last year’s con and loved it. It was so comfortable, but I was still immediately identifiable as Eleven. I also didn’t have to do much sewing for it either. While I’m not immediately planning to wear it at the con, I learned my first year how beneficial it is to have a back up cosplay for those days when a cosplay goes wrong or you just need to be comfortable.

General Leia from The Force Awakens

I already wore a version of this before, but never at a con. I made it very quickly, so the tunic could use some work, and I’ll probably make a brand new vest. It’s a simple cosplay, but since the con is sci-fi themed this year I’m anticipating a lot of Kylo Rens and Han Solos to take pictures with. I’ll probably wear this one on Friday to get things started.

Kiki from Kiki’s Delivery Service

I’ve had this cosplay in progress for absolutely ages. Right now the dress is mostly made; it just needs some finishing touches and it’ll be ready to go. I’ve already ordered the red bow, and I have the shoes, purse, and cat plush ready to go. This one will probably be Saturday night, after the cosplay competition when I’m tired and want to be comfortable.

Party Girl Kylo Ren from The Force Awakens

This is another cosplay that I planned for last year but never made. I’ve already purchased everything (including the wig and props) and all of the pieces for the dress are cut but never got around to constructing it. It’ll take a weekend of sewing, but I think I can manage it pretty easily. Party dresses are right in my wheelhouse.

Risqué Alice in Wonderland

This is one that I may or may not do, depending on time. Akai holds a risqué competition every year, and I’ve got a half made Alice cosplay that will never be finished because I cut the bodice wrong. I’ve been toying with the idea of turning it into a tearaway outfit and participating in risqué. I’m saving this project for last, in case I run out of time, so we’ll see how this one goes.

Historically Accurate(ish) Elsa from Frozen

This is it. This is the big one. I’ve entered the cosplay contest two years in a row without putting a lot of effort- I entered cosplays that I enjoyed more for the sake of getting feedback and getting the chance to walk across the stage. More like practice runs than actually competing. This year I’m determined to put my best foot forward, and my dream project is creating an Elsa cosplay that pulls from the correct time period (Frozen should be set between 1820s-1840s) and also draws from Brittney Lee’s concept art, as seen here. I want to make the ice gown as a softer, more historically accurate version. It still won’t be perfect- I’ll probably use zippers and I’m definitely not about to sew it by hand- but I have a specific look I’d like to achieve, and that includes making the proper layers of chemise, bloomers, petticoats, and stays.

So that’s my plan for Akaicon 2017! I feel like I’ll have just enough time to get it all done…as long as I start sewing right this second.

How to Write a Bio for a Theatre Program

I’m going to be honest. Writing bios for playbills are the worst. There’s just something so uncomfortable about writing a short paragraph all about yourself in the third person (she says as she writes a blog about her personal interests, but I digress). However, while writing a bio might make you feel weirdly braggy, they’re so great in the long run. Not only does it give the audience more information about you and where they might have seen you before, but you never know when there might be a director or producer in the audience who likes your performance and can get more information about you from your bio. It might lead to your next role!

I’m going to show a couple different examples- a high school student actor, a college graduate actor, and a college student tech. At the end, I’ll show the finished bios, and then a couple of my own that I’ve used before!

In order to write your bio, it’s easiest to start small and gather your information first. There’s a few crucial things you’ll want to include, and then depending on your word count, you can add more information from there. So first, the important things.

Education and Training: Are you currently in school? Are you studying a specific field that pertains to theatre? Or are you taking classes or getting coached? These are all good things to know. Also, do you work in a theatre related field? It could be anywhere from working as a professional actor to helping out at your local dance studio. Write it down!

Previous Roles and Previous Work: If you’re an actor, this is where you can list some of your past productions. Highlight your most notable roles, and your most recent ones. this is a great time to say that you played Gabriella in HIgh School Musical last year, but maybe not the time to say that you played Tree #3 in your kindergarten play about photosynthesis. If you’ve been in a lot of productions, pick three to five favorite shows. If you need to narrow it down, stick to your most recent and your most local roles.

You haven’t played any notable roles? List just the shows you’ve been in. And what if it’s your first role? Then say it in your bio that it’s your first role! Audience members will be impressed by your big debut.

If you’re listing tech work, start by saying other shows that you’ve worked in the same field. If you’re the lighting designer for this show, start off by saying other shows you’ve designed lights for, and then move into other productions you’ve done tech before. Always start by listing the most recent work, because then there’s a better chance audience members have seen your work before.

Special Thanks: Is there someone you’d like to thank? List them! Mom and Dad for driving you everywhere? A friend for helping you run lines? Your director, choreographer, or music director for casting you in the show or giving you extra coaching? This is a great time to acknowledge the people who have helped you get to where you are. A lot of people will slide in inside jokes or special nicknames as well, just to make it more personable.

So now that you have your important information, it’s time to actually sit down and write out that information. You need an opening sentence, which 99% runs along the lines of “so and so is so excited to be in what’s-it’s-name.” You think I’m kidding, open a playbill and count how many times you see the words “excited,” “ecstatic,” or “thrilled” in the first sentence of the bios. But do you know what? It works! Feel free to use it if you can’t think of anything else.

Then take the information you have and write them out into sentences. See how easy it is to formulate your bio when you have your info? It all just sort of pops into place.

Once you’re done, count how many words you have. Sometimes you’re required to stay within a certain word count; sometimes you can write as much as you want. Err on the side of short and sweet. Too many words can come across as too braggy, and also you never know if your bio will end up being too long to fit in the program. Sometimes the playbill designer will edit it down for you, but I have seen bios that have cut off mid sentence. Shorter is better!

Once you’re satisfied with your bio, let a friend look over it for grammar and spelling errors. Nothing will be sadder than looking at the program on opening night and realizing you wrote “they’re” instead of “their,” or spelled your own name wrong. Best to get that second pair of eyes to take a look at it!

So here’s a few examples of what a bio can look like:

And just for fun: here’s a couple of my recent bios.

I hope this was helpful! Comment below if you have questions. And show me your super cool bios!

My Plum Paper Me Planner

I’ve gone through quite a few planners since high school, from inexpensive academic monthly booklets to big spiral bound monsters to whatever I buy on impulse at Target. My go to brand, though, is the Plum Paper Planner. They come in multiple sizes and styles, and there’s a million ways to customize them. I’ve previously used their vertical lines version, but this time I decided to try their Me Planner, which has seven customizable subject boxes.

When I ordered the planner initially, I checked everywhere for a coupon code and couldn’t find anything higher than 10%. Imagine my dismay when not more than half an hour later the Plum Paper Facebook page posted a 25% code! Luckily I was able to email their customer service and they were able to honor the 25% off, which made a big difference.

My planner was shipped in a really sturdy cardboard box with the Plum Paper logo. (Who knew Tsum Tsums were good address deflectors?) The packaging was great; there was absolutely no damage to the outside and the planner inside was wrapped in clear plastic.

I’ve had two Plum Paper planners before; my first one had a clear plastic cover with a printed paper cover underneath and the second one was a sturdy but bendable kind of vinyl. My newest planner is a hybrid of the two- a clear plate cover with the sturdy printed vinyl cover underneath. So far I’ve been able to carry it around in my work backpack without any damage, so fingers crossed it holds out!

The new covers are also customizable; I chose the aqua variation of a floral cover and added a C monogram. I also added a quote from Anne of Green Gables: “isn’t it nice to think that tomorrow is a new day with no mistakes in it?” (It’s actually from the third Anne book if I remember correctly, but I digress.) Apparently Plum Paper covers can all be swapped out now as well, but I haven’t tried that yet.

The first few pages include a yearly calendar at a glance for 2017 and 2018, a spread to write monthly birthdays and events, and a spread for “ideas, plans, and goals.” Then it goes into the individual months.

Each month begins with bubbles for three monthly goals and sections for birthdays, events, and things to remember. There’s also a notes page, which I use to help map out my rewards for my weight loss progress.

Each month has a full month at a glance spread with an additional column for notes or lists. Nothing to write home about, but still useful and still important.

The weekly view is really when things get exciting. Like other planners, each week has a full vertical column for each day, but each column is divided into seven specific categories. Plum Paper does charge if you want your sections to be labeled, but I personally thought it was worth it. I divided my categories into work, theatre, to sew, to blog, to do, to clean, and events, and it makes it so much easier to organize my days without having to spend a ton of money on stickers.

One of the biggest perks of a Plum Paper is the customization. I chose to add an extra note page and a page of to do lists. Listen, I just love to do lists. I definitely needed them.

I also opted for two bonus sections, fitness and blogging. The first page of the fitness section has space to document measurements, weight, goals, and rewards for the year and the last page has a graph to chart changes in weight. Each month has a two page spread to track weight, measurements, the month’s fitness plan, daily exercise, and daily water intake.

The blogging section begins with monthly overview pages for ideas, goals, and stats. The section also included pages for post ideas, tasks, to do lists, giveaways, reviews, advertising and sponsors, and a page to track stats and profit over the course of the year.

The rest of the planner is pretty standard- a page each of graph paper, passwords, contacts, and holidays, plus a sturdy two sided pocket.

Overall, I’m a huge fan of my Me planner. Not only does it keep me super organized, but it’s a well made and incredibly customized product with sturdy dividers, a great cover, and literally the smoothest paper I’ve ever written on. I might not even need to order stickers for it! I’m also a huge fan of their customer service, so I can pretty much guarantee I’ll order from them again.

Comment below if you want to see more about my Me planner- more photos, a plan with me, or more detailed looks at the fitness or blogging sections!

Get to Know Me!

Here it is, kids- my first official Youtube video! It’s a scary world on the Youtube, but it’s exciting. I figured the easiest thing to start with was a tag about myself. I guess? I’m not sure. This will definitely take some getting used to though!

Give the tag a try yourself; leave a comment if you make a video or post of your own!

  1. What is your middle name?
  2. What is your favorite color?
  3. Who was your first best friend?
  4. How tall are you?
  5. Cats or Dogs?
  6. Funniest moment throughout School?
  7. How many countries have you visited?
  8. Are you in/gone to college?
  9. What was your favorite/worst subject in High School?
  10. What is your Favorite drink?
  11. What is your favorite animal?
  12. What is your favorite perfume?
  13. Tea or Coffee?
  14. What would you (or have you) name your children?
  15. What Sports do you play/Have you played?
  16. What is your favorite book?
  17. Who are some of your favorite YouTubers?
  18. What is your favorite movie?
  19. Are you Single or Taken?
  20. Whats your idea of an ideal first date?
  21. How many Girlfriends/Boyfriends have you had?
  22. Favorite memory from childhood?
  23. Do you speak any different languages and how well?
  24. Do you have any siblings?
  25. How would you describe your fashion sense?
  26. What is your favorite restaurant?
  27. What are some of your favorite TV shows?
  28. PC or Mac?
  29. What phone do you have? (iOS v Android?)
  30. Tell us one of your bad habits!

Gertrude McFuzz (costume and show recap!)

When my sister was in high school, she played a Bird Girl in Seussical, so of course I went to see her. I had never heard or seen anything from the show before, but I figured it would be cute. I walked out that night convinced that Gertrude McFuzz was now a dream role.

I didn’t think I would ever have a chance to play her, but a friend of mine at work kept telling me about this theater he worked at, and how he wanted to propose Seussical for the upcoming season, and that I needed to audition. Everything finally fell into place, and I can safely say that it was the most nervous I’d ever been at an audition. At this point, I had never been an actual lead in a musical, outside of understudying for Carrie, and there were a lot of talented people who came in. I sang Teen Fiona’s verse from “I Know It’s Today” and was asked to stay to read from the script, and then sang some of the music for Gertrude, Mayzie, and Sour Kangaroo. It took several agonizing days- almost a week!- to hear back, but I was cast as Gertrude, and I literally burst into tears.

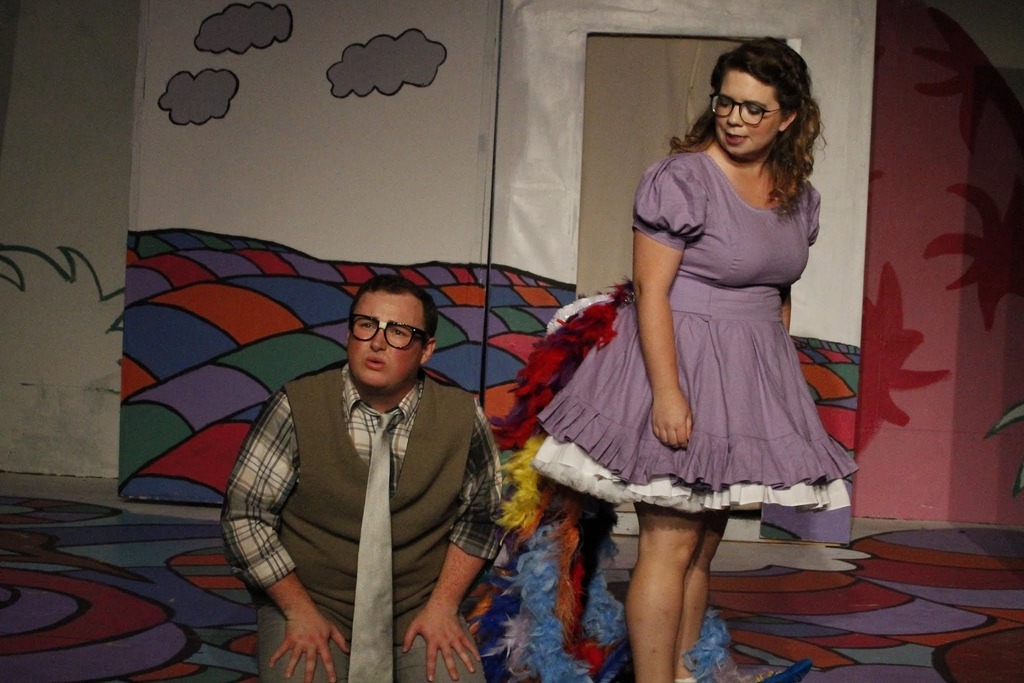
Playing Gertrude was both one of the easiest and hardest roles I’ve ever played. On one hand, I knew the show backwards and forwards coming into the rehearsal process, and I understood exactly how I wanted to approach playing the character. On the other hand, I got really anxious about singing. Really anxious. I was a mess. Luckily, my friend Cara was the music director and she was literally the most amazing coach, and I made a lot of improvements.

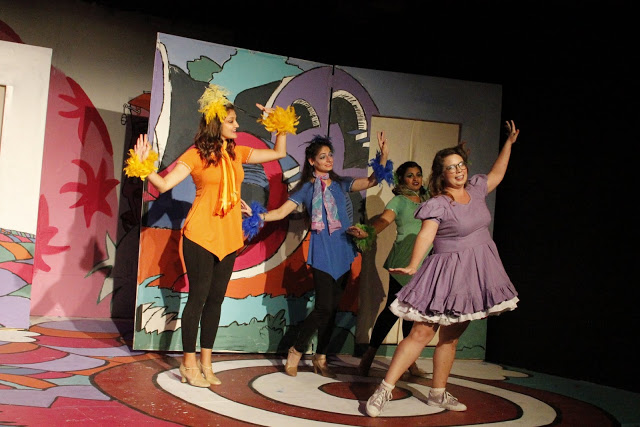
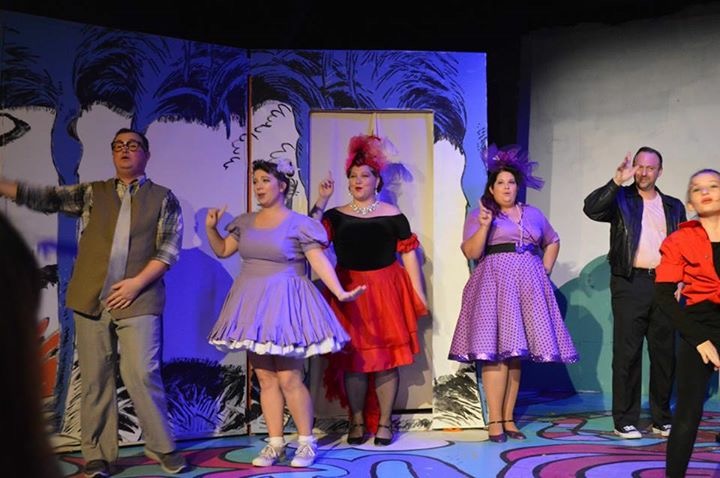
I also had one of the most fun casts I’ve ever worked with. It was a really hilarious group of people, and I’ve been lucky enough to do multiple shows with several of the cast members now.

The opening weekend was fantastic. I was in great voice, I felt fantastic, and both my brand-new boyfriend and my family from Nashville were able to come see me. It was amazing!

And then I got the flu.

I thought it was just allergies- I have so many of them, after all. But I was feeling worse and worse, and I eventually dragged myself to urgent care. And sure enough- I had the flu. While I was playing my dream role.

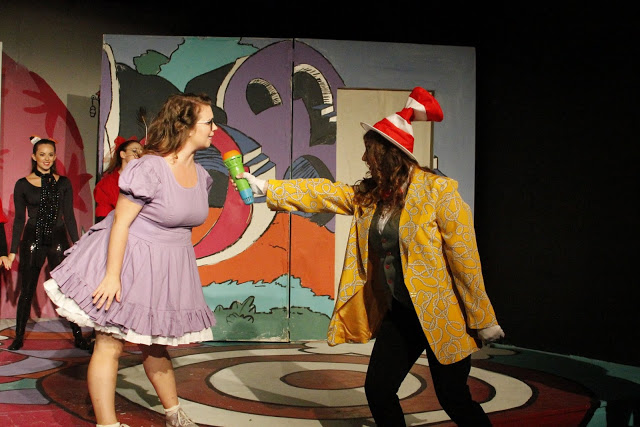
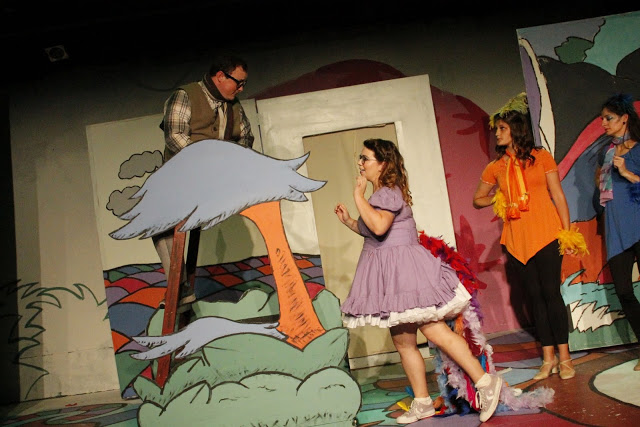
My sweet boyfriend took good care of me and I spent a lot of time resting my voice and sleeping, but I was still not up to par. Luckily Gertrude is a character role rather than, say, Christine Daae, so I could use some raspiness and squeakiness, but I was miserable. I could usually get through act one, but I had the worst time battling through “All for You” in Act two. Luckily, I had three fantastic Bird Girls to back me up, and my Horton was literally the most patient and sweetest person I could have possibly worked with. In the end, I got most of my voice back, even though it didn’t sound as good as I would have wanted it to, and I still got to play my dream role.

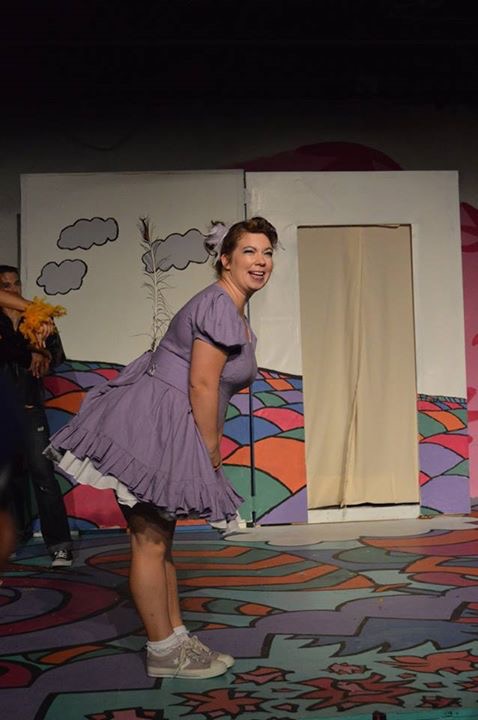
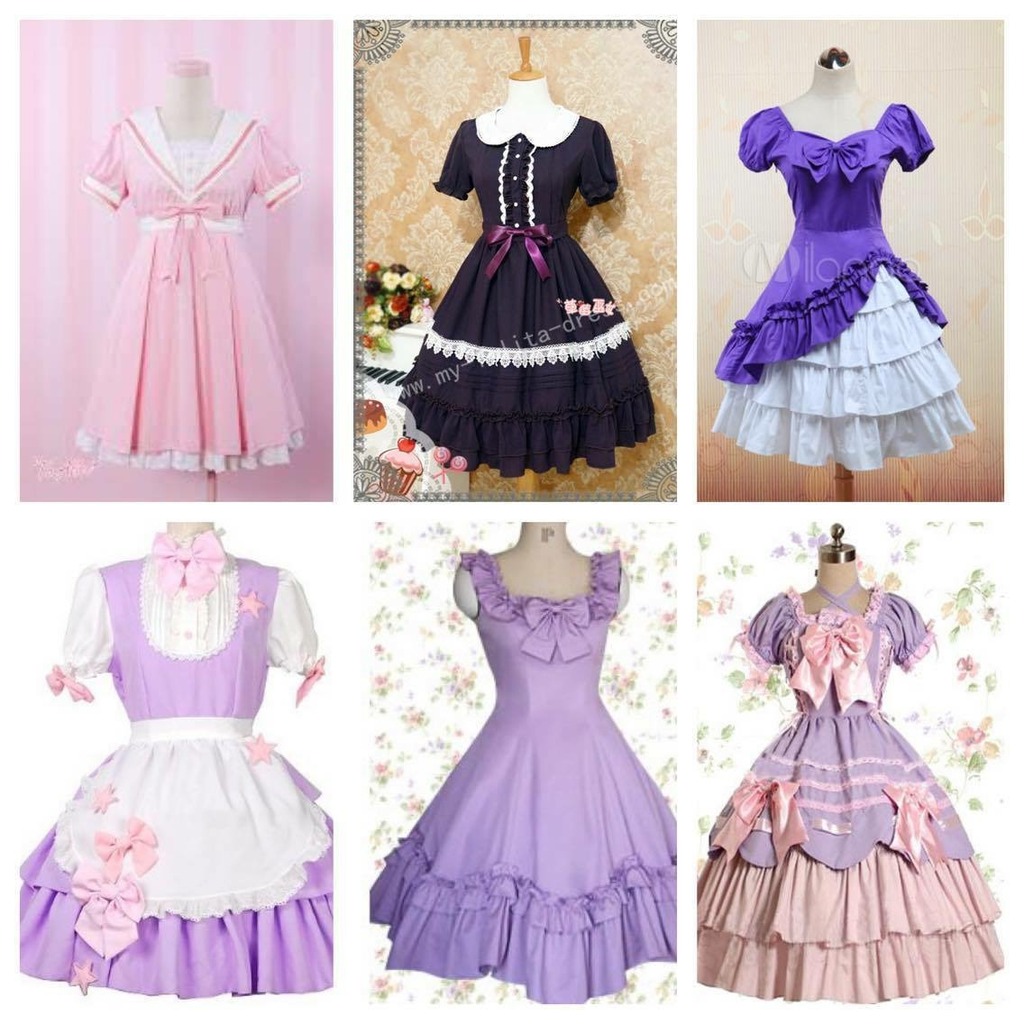
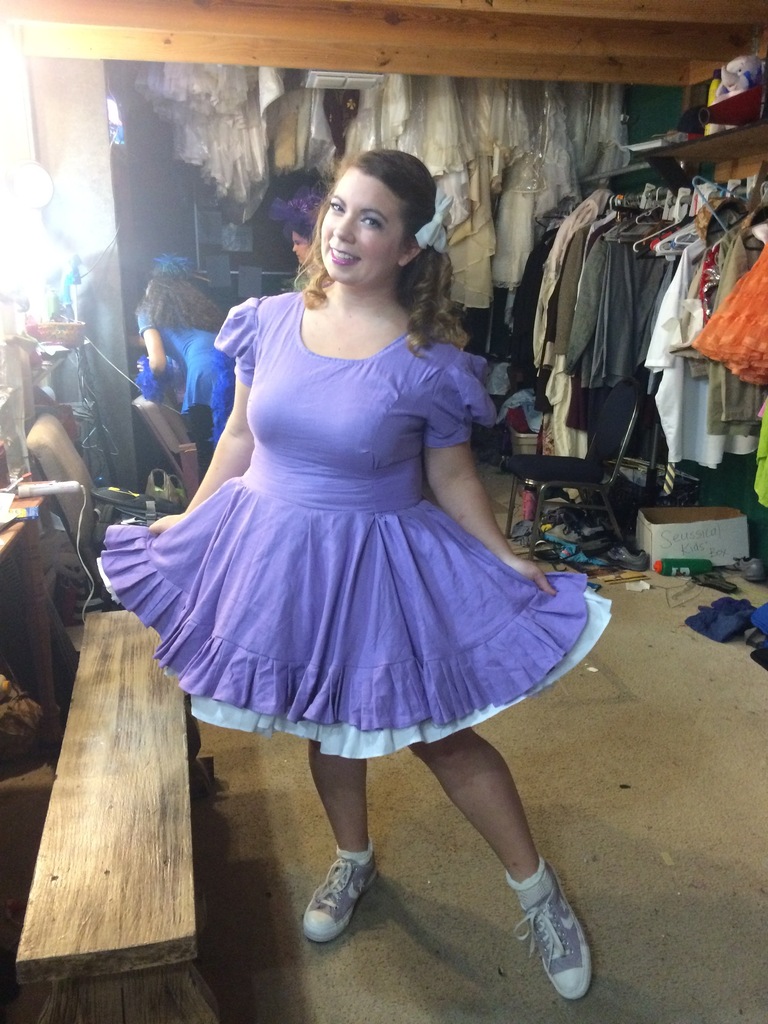
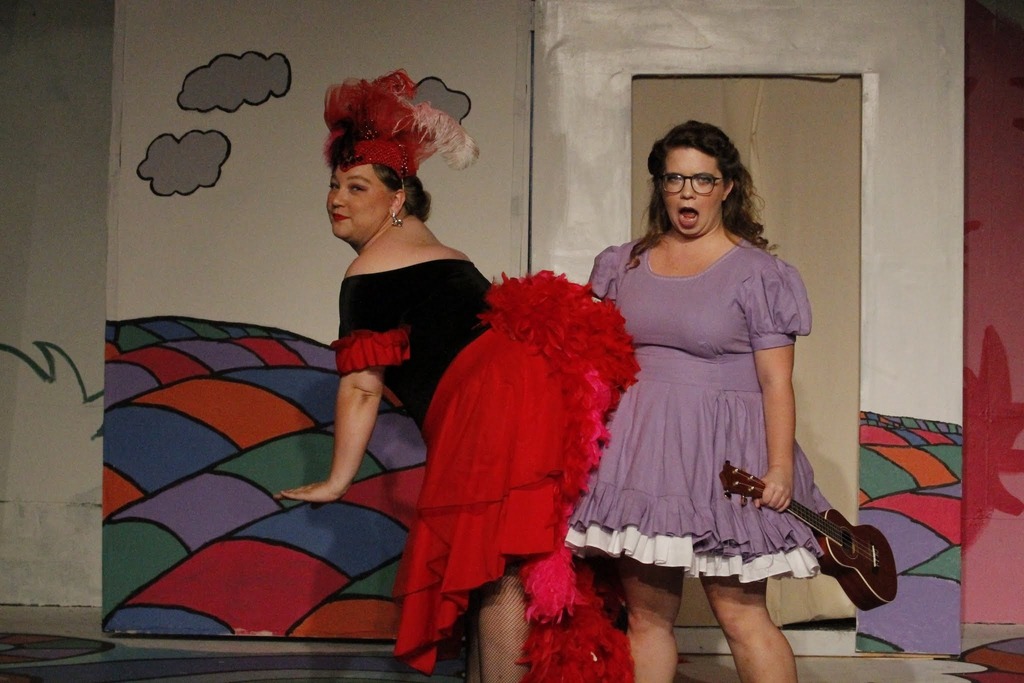
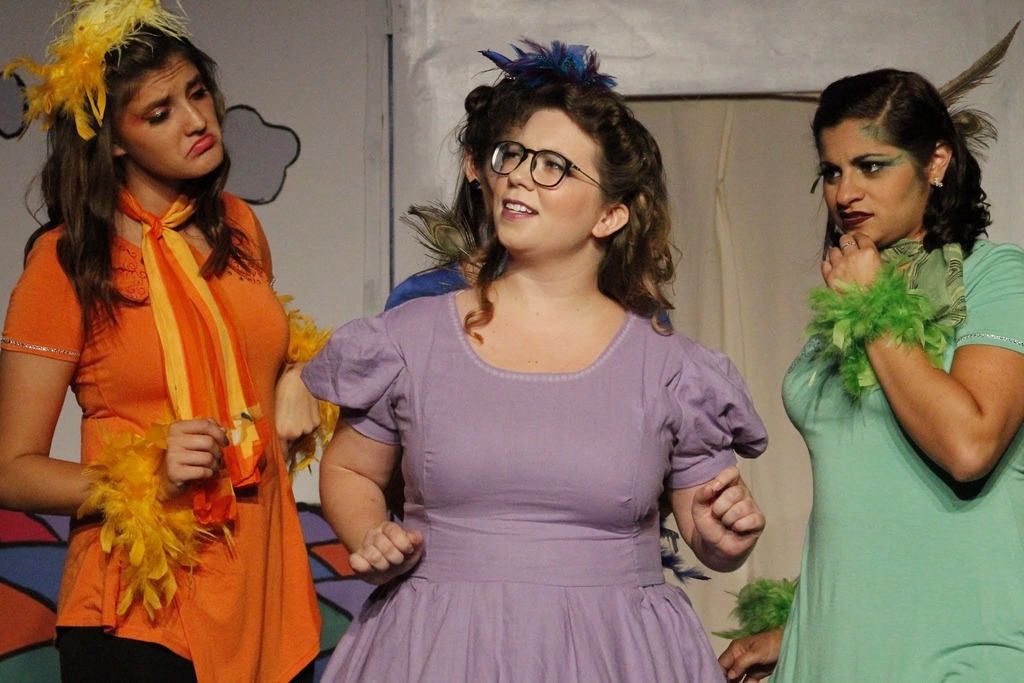
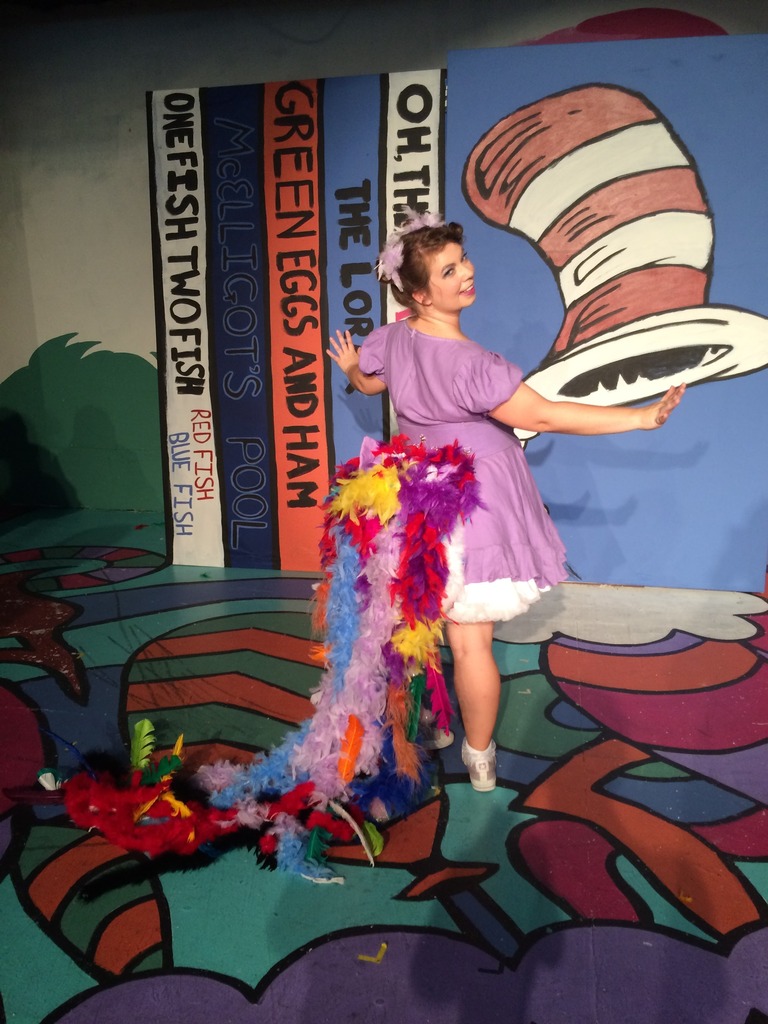
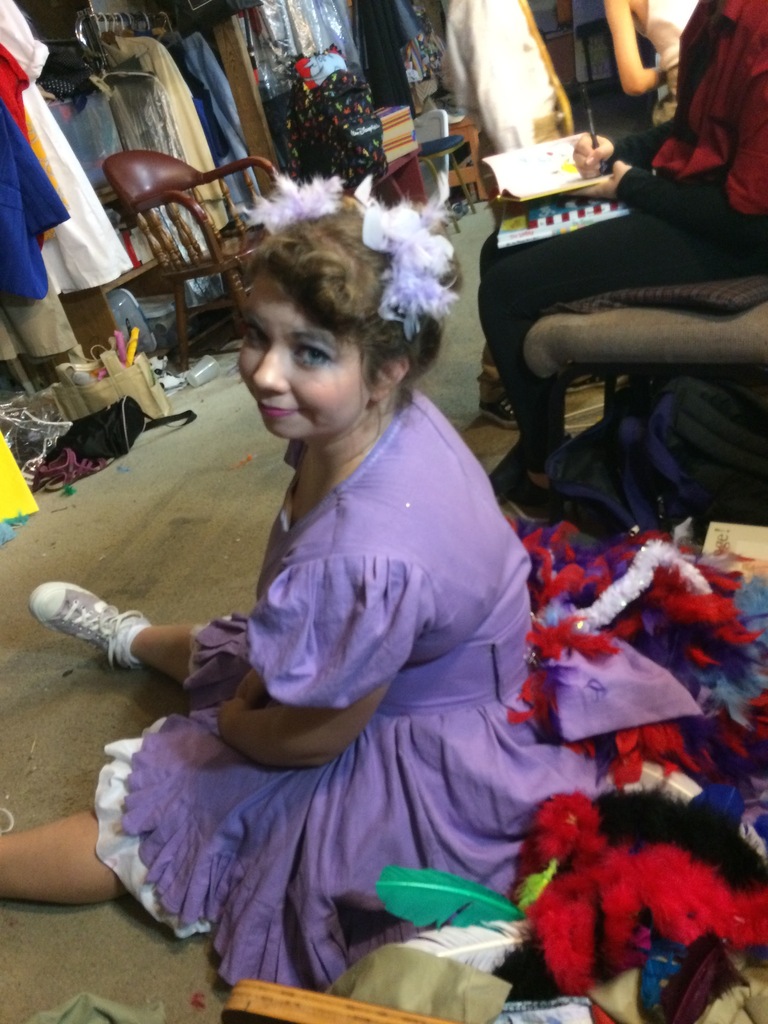
I also got to make my costume for Seussical! The costumer and director both agreed, as long as the dress was in a sort of 1950s style and lavender. With those parameters, I had plenty of freedom! I looked at a lot of 1950s children’s party dresses and simple Lolita outfits. Gertrude is the plainest of the birds; I didn’t need anything fancy or detailed, but I knew the kind of shape I wanted.

I ended up using Simplicity 8324, their Alice cosplay pattern, but simplified it a lot. I eliminated the pinafore and a lot of extra ruffles and trims and cut everything from a very soft lavender linen that I originally bought for a Rapunzel cosplay (which still hasn’t happened, oops). The underskirt was made of white muslin, but I cut it differently from the pattern. To cut down on bulk at the waist seam, but for maximum fluff, I cut the base as a circle skirt, and then added a 10″ long ruffle to give the skirt more volume.


During the first dress rehearsal I realized I wasn’t getting the right amount of poofiness, so I added my trusty Malco Modes petticoat underneath. I also realized I needed shorts, since my skirts were short but I was moving so much! Because they would be visible (especially when I rolled across the stage at the beginning of “All for You”) I used Simplicity 8154, a lavender bedsheet from Walmart, and lace from my stash to make a pair of bloomers.

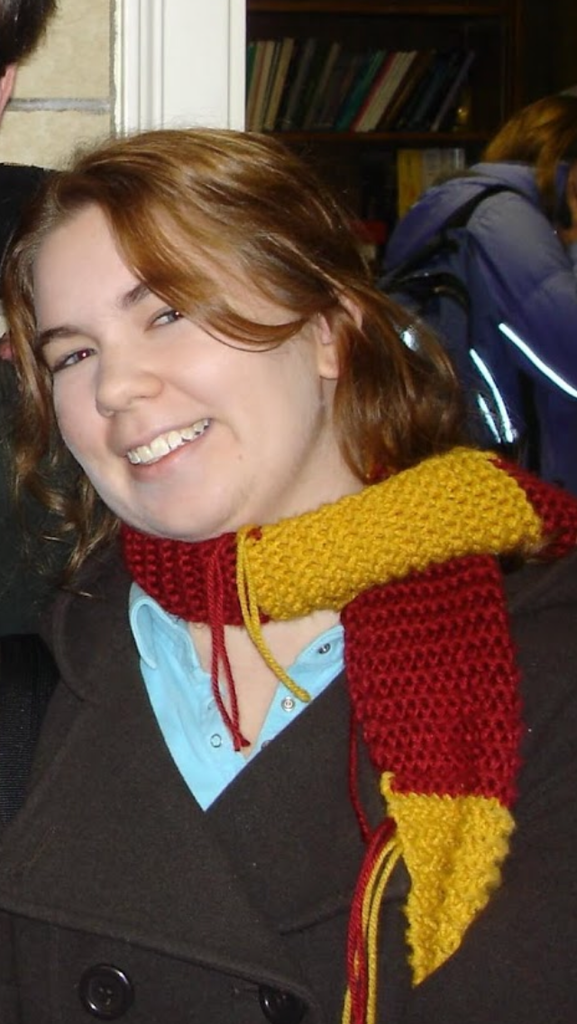
The director wanted most of the characters in converse sneakers, so I bought a lavender pair on Poshmark. Initially my hair was going to be down and curled, with a white bow, but I looked entirely too much like a contestant on Toddlers and Tiaras. After the first performance, I bought two small bun forms and put my hair up in two high buns, similar to the original Gertrude in the Broadway production. For makeup I used a lot of purples from my Wet n Wild Petal Pusher palette and my Urban Decay palette, and I combined several lip color to make the perfect pinky-purple lip. Comment below if you’d like to see a hair and makeup tutorial!

The most important thing, though, was my tail. Or rather, tails. If you haven’t seen the show, Gertrude has a plain one feather tail, and she thinks that Horton the elephant will notice her if she had a prettier tail. The cool girl of the jungle sends her to get pills to make her tail grow, and Gertrude ends up with a tail so long and heavy she can’t fly. So you can see how this was a challenge.

For the one feather tail, I made a big butt bow out of the same lavender linen that fastened to the back of my dress with one large snap in the center. Attached to the bow was one long, slightly scraggly peacock feather that stood straight up from my back. It was the right combination of sad and wimpy, but still noticeable from the audience.

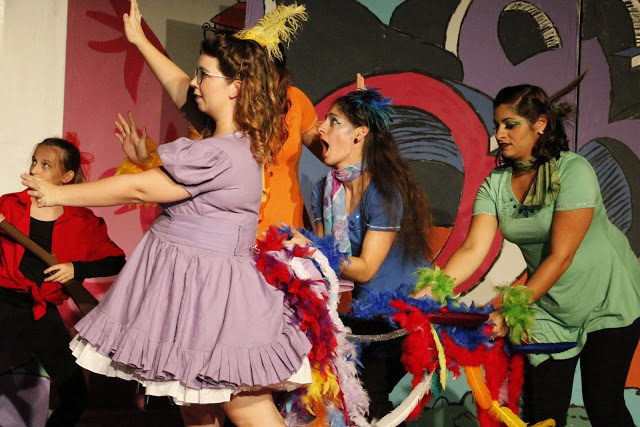
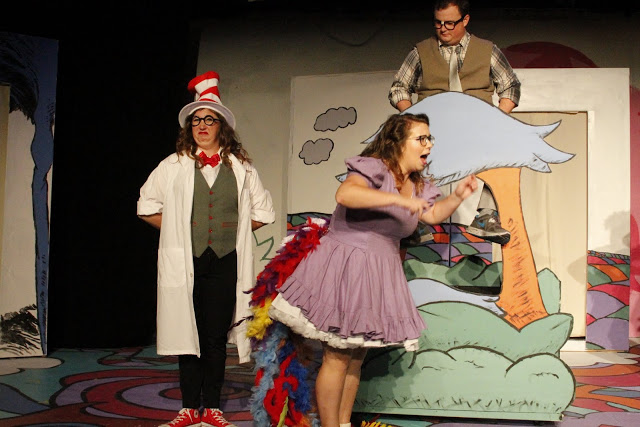
The first time Gertrude’s tail grows is onstage, in the middle of the song. When I constructed the white petticoat layer in the dress, I added a pocket with a zipper closure in the seam between the circle base and the ruffle. Inside the pocket I sewed three feather boas. At the right point in the song, one of the bird girls took off my bow and single feather while the other two unzipped the pocket and pulled out the other boas. It was a great moment that worked really well onstage!

As soon as the number was over, I ran backstage to put on what we affectionately called “the mega tail.” I built a reinforced belt that wrapped around my back, and I attached four keychain loops along the belt. The tail itself was a panel of lavender felt that I backed with canvas to make it sturdier, and then I attached a whole slew of feather boas- some from the theater’s shop, some from the dollar store, and some from Joann’s. I also hot glued individual brightly-colored turkey feathers to pipe cleaners and added them to the ends of the tail.

At the top of the panel I had four large loops from large hook and eye sets. So when it was time to switch, the bird girls (or whoever was handy backstage) would stuff the growing tails back into the skirt pocket, zipped it shut, and hung the panel onto the keychain loops. It worked so well!


My first attempt I used large hooks, but the panel kept popping off when I moved. With the locking loops, the panel stayed in place and moved with me easily.

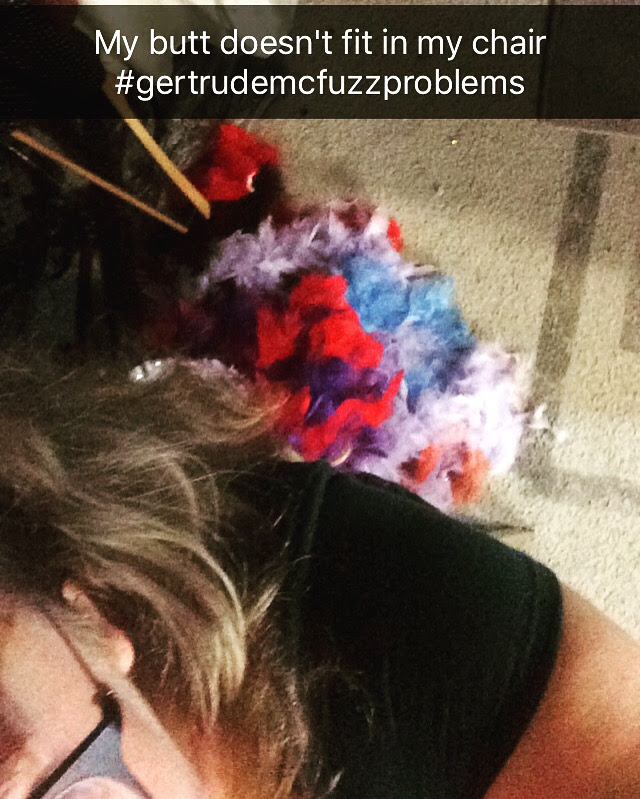
The downside? It was heavier than it looked! All in all it was fairly lightweight, but I ended up wearing it for about an hour and a half straight. It rested right on my lower back, so it weighed me down a bit, especially during the end of act one when I was running around a lot. I also got super sweaty, not going to lie. It helped that the reinforced belt was strapped and overlapped over my lower back, which gave me a good base, and the four points of contact distributed the weight evenly. They ended up designating a chair to be my “tail chair” backstage. It was tucked away in a corner, out of the way, (since Gertrude doesn’t do much in the middle of act two) and I draped the tail over the arm.

I also could only take bathroom breaks when someone took my tail off. Usually I waited until act two- in the beginning, Gertrude is onstage for a few minutes in the beginning, so after that I would run backstage, have someone take my tail off, run to the bathroom, and then have someone put my tail back on. It was a little chaotic!

Productions usually vary, but I ended up keeping the tail on for the beginning of “All for You.” At the top of the scene I snuck through the audience with my tail trailing behind me and army rolled across the stage (tangling the tail around me). During the song, Gertrude dramatically recounts her process of getting her tail taken off. So as I sang the “pluck pluck pluck- ouch, it hurt a lot” bit, the bird girls popped off my mega tail while one of them snapped my one feather tail back onto the back of my dress, just in time for me to turn around to sing “and suddenly Gertrude could sail” and show the audience that my one feather was back. The Cat took my mega tail offstage, and that was that! In our total fifteen performances, we were able to do all my tail transitions without a hitch.

I’m hoping to do a video showing the three different tails and how they work, and a makeup and hair tutorial for Gertrude, so comment below if you’d like to see those, or have any questions about Seussical!

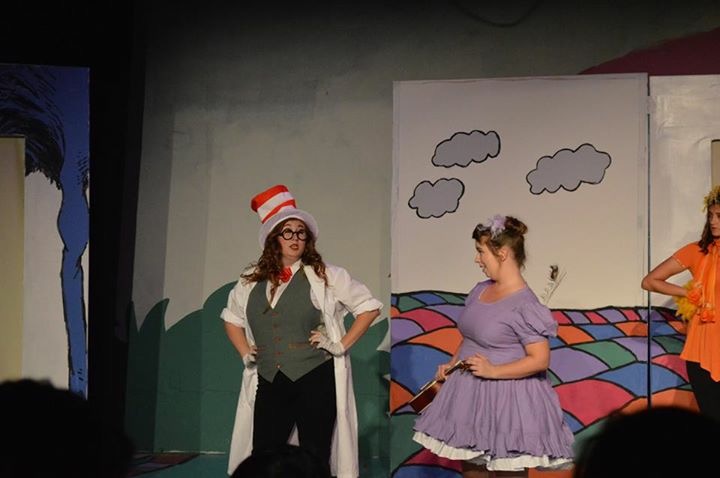
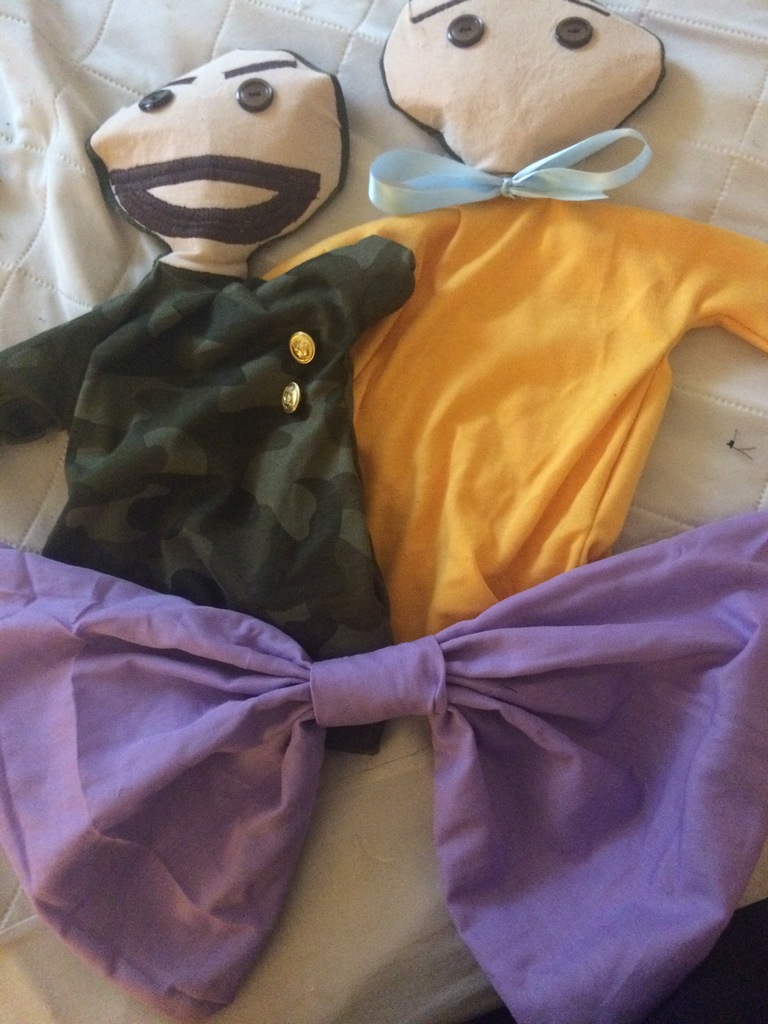
(I also made the puppets for the Cat to use in act two! They were a super quick project made from clearance tee shirts I bought from Target and some scraps and buttons from my stash. I didn’t use a pattern, but they worked pretty well!)

0 down, 55 to go 

(What a way to relaunch my blog, huh? Just jumping right into it. Well, here goes!)

I was in the eighth grade the first time people started bringing up my weight. I had always been teeny tiny before that, until puberty hit me like a Mack truck- well, except for the growth spurt that everyone else seemed to be getting. Looking back, I still wasn’t fat, but I took it to heart. In high school I gained some weight, but managed to keep in under control by staying active on the cheer squad. My weight spiked right before senior year when we moved and I started at a new school, then went down when I started doing theater. My weight spiked again (majorly) when I started college, then went down when I started my Disney college program. And thus I started on a Sneaky Hate Spiral- going through a period emotional turmoil, gaining a lot of weight, starting a workout/diet regime, losing five pounds, giving up, and repeat ad nauseum.

Now that I solidly fall into the category of An Adult (when did that happen, I ask myself as I sit in my bedroom decorated with Disney princess art) I know I really need to lose weight for the sake of my health. I’m lucky that my job keeps me very active, but I don’t do any intentional exercise outside of it. I also have terrible eating patterns, which have sometimes veered into disordered eating in the past. And I can feel it. I don’t feel comfortable in my clothes, my asthma is a constant struggle, I’ve been getting this acid reflux nonsense that affects my singing voice. In general, I just constantly feel unhealthy. Would I like to lose weight to be thinner? Absolutely! But honestly I just want to feel better. So with that in mind, I’ve set some goals for myself.

-track what I’m doing. I have a Fitbit Blaze (currently borrowed from my best friend who didn’t want it anymore; I’m going to pay her for it so I can keep it) that I’ve been wearing and using fairly consistently for the past six months. It’s given me a pretty good window into my current statistics, and it’s a solid (and honestly kind of fun) way to track where I am and where I’m going.

-drink more water. I live in Florida, America’s sweaty armpit, so I’m constantly surrounded by heat and humidity. And my job not only requires a lot of running around, I also wear costumes made from literally the worst poly/wool blend that don’t breathe, so I sweat constantly. You would think I would chug water all the time, but somehow I’m terrible at it. I need to up my water intake, or at least reliably drink enough water.

-be mindful of my eating. I first tried tracking calories in college, using the Sparkpeople website, and quickly found myself spiraling into a crazy person who couldn’t accurately verify exact portions and ingredients of the school cafeteria food she was eating, and therefore went nuts. A lot of the sites I’ve tried since then don’t calculate and accommodate for calories burned, either, so I would go through phases of working out for an hour but still eating only 1000-1200 calories a day. It wasn’t healthy and it never worked. And when I wasn’t tracking, I fell into unhealthy patterns- skipping breakfast, eating a lunch of a soft pretzel or a muffin, and then eating my body weight in fast food or pasta for dinner. I want to focus on eating at consistent, regular times and eating smaller portions. When my eating patterns settle and I can consistently eat reasonable amounts at reasonable times, then I can try cutting out certain foods and try different eating plans. Right now I need to start with baby steps. What I will cut out though? Soda and fast food. I’ve already cut back considerably since my boyfriend and I started cooking for each other (usually him, if I’m being honest!) but those are two things I know I can cut out.

-exercising regularly. My job requires a lot of energy- so much energy that sometimes my Fitbit automatically switches into exercise mode! However, when I’m out of work I usually become a couch potato. I turn on the TV (lately I’ve been rewatching Glee because holy guilty pleasure, Batman) and eat dinner while I play around my phone and I stay there until it’s time to go to sleep. Granted, I’m often in rehearsals for shows (I have two shows that are starting soon and an audition for a third!) and that keeps me busy, but I don’t do any kinds of specific exercises. My goal is to run three times a week (at least once minimum) and start doing Cassey Ho’s Pop Pilates regularly (at least one video per day from the calendar). I actually really love running, and I do two or three Disney 5 or 10K races a year, but I’m never consistent with running, even though I know that I always feel so much better when I run. I’ve also done pop Pilates before but never stuck with it after seeing the first minimal changes. So really, what I’m working towards is consistency with exercising.

-taking vitamins. I started doing this a few weeks ago and it’s made a difference already! I also have two prescription medications for my asthma and allergies, and I want to consistently take those so I can get the full benefits.

I’m hoping that by making lifestyle changes I can lose the weight and improve my health, and that by blogging about it I can stick with it. I’m tired of feeling run down and not feeling my best, and I want to do better.

How much weight am I talking about losing though? Well, to be quite honest I haven’t weighed myself in a while, but I know that at my heaviest, my freshman year of college, I was…drumroll please…170 pounds.

Yikes. That’s a lot for someone of my height. A lot. That’s so much extra work that my organs are having to do to compensate for the extra weight pushing on my frame. That’s not good. I also know that I’m not happy with how I look. Weight is such a personal thing, and while I don’t hate how I look, I don’t love it. And I’m always uncomfortable in clothes. No matter what I wear, I’m constantly sucking it in or tugging at things to try to hide my own perceived flaws, and I’d like to get myself at a point where I can feel more confident. Also, I know for a fact that I have lost out on certain parts in shows because of my weight. It sucks, but it’s true. (Ask me sometime about my Guys and Dolls experience.) I was also told at a Disney entertainment audition that if I lost the weight (and fixed my eyebrows…) they would take me. It kind of sucks getting those kinds of responses.

My lowest weight was the end of my first college program, when I weighed 139. I haven’t seen a number that low since. And that still wasn’t even in the approved range that my doctor recommended, which for me is about 110-120. My goal is to eventually get down to 115. That’s a 55 pound difference from my heaviest weight. Yeah, it’s a lot, and yeah, it’s a lot of work, but I know it’ll be worth it. I don’t feel healthy, I don’t feel happy in my own skin. Maybe I won’t reach 115, but any kind of change will be beneficial.

I took a series of embarrassing photographs of myself at my current weight. It’s so bad. See, I bought this adorable shirt a couple of years ago, a white juniors-cut tee with Ariel’s purple clamshells on it. But I only bought a large, which was already too small, and then it shrank. So now the cute clamshells sit comically high on my clavicle instead of where they want to be. I figure that taking progression photos once a month in that shirt (with the same bra and the same pair of tight yoga shorts, aqua because of course I’m continuing the Ariel theme) I can make it easier to see the changes in my body. I’m, uh…well, let’s be real. I’m not ready to show those photos to the world yet. But they’re eye opening, and when I’m ready to post them I will. In the meantime, here’s the most recent full body shot I have- this was taken the night I auditioned for Heathers.

Last night I went out and ran. I actually ran the full distance of a 5k. My time wasn’t great- 48:14- but I’m going to use a 5k runner app over the next few months to give myself the opportunity to progress. And I felt fantastic afterwards, and slept like a rock, and I’m feeling really good today, so I want to keep this up.

I’m going to post my weight and measurements and changes on my fitness page (which is in the bar at the top) and I’ll post updates as my body changes and I make changes to my health plan. And wish me luck!